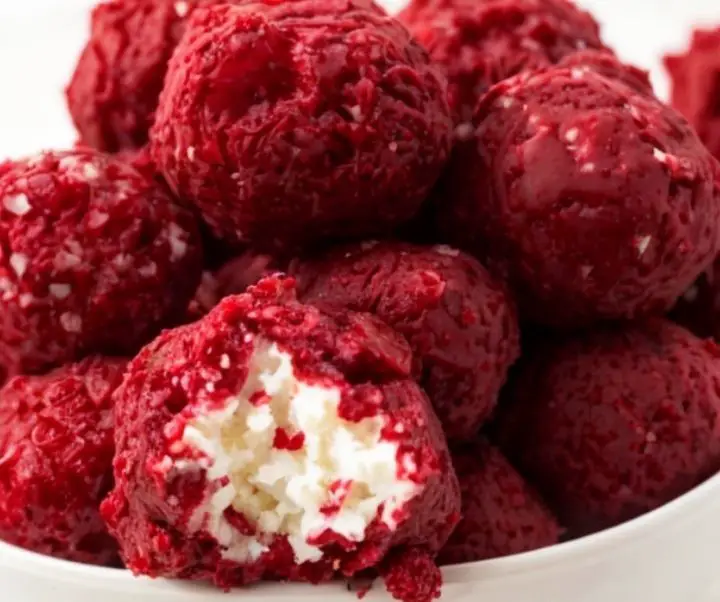
Red Velvet Cheesecake Balls are a delightful fusion of two beloved desserts: the rich, cocoa-infused red velvet cake and the creamy, tangy cheesecake. This bite-sized treat encapsulates the essence of both, coated in a luscious layer of white chocolate, making it an irresistible dessert option for any occasion. The vibrant red color of the velvet cake crumbs, paired with the smooth cheesecake center, not only makes these balls a visual treat but also a palatable delight.
The concept of combining red velvet cake with cheesecake to create a ball of dessert heaven is a relatively modern culinary innovation. It draws on the traditional appeal of red velvet cake, known for its distinctive color and texture, and the classic cheesecake, revered for its rich flavor and creamy consistency. This combination results in a dessert that is both familiar and novel, offering a unique taste experience that is hard to find in other treats.
Red Velvet Cheesecake Balls have gained popularity for their versatility and ease of preparation. They are perfect for celebrations, such as Valentine’s Day, where their red hue can symbolize love and affection, or during the holiday season, adding a pop of color and taste to the festive table. Moreover, their no-bake option makes them a convenient choice for those seeking a quick yet decadent dessert. For a deeper dive into the origins of red velvet, explore the history of Red Velvet Cake to appreciate the evolution of this beloved flavor.
Why We Love Red Velvet Cheesecake Balls
There are numerous reasons why Red Velvet Cheesecake Balls have become a favorite among dessert enthusiasts. Their simplicity, combined with the elegance they bring to any dessert table, makes them a go-to choice for both novice and experienced bakers. Here are the key factors contributing to their widespread appeal:
- Ease of Preparation: One of the most compelling reasons to love these dessert balls is their straightforward recipe. Utilizing a box mix for the red velvet cake component simplifies the process, making it accessible even to those with minimal baking experience. The no-bake cheesecake filling further eases the preparation, requiring only mixing and chilling.
- Visual Appeal: The striking red color of these cheesecake balls makes them stand out. Whether they’re served at a casual family gathering or a formal event, their vibrant appearance is always a conversation starter. This visual appeal is enhanced when the balls are decorated with drizzles of chocolate or a sprinkle of red sugar, making them as beautiful as they are delicious.
- Perfect Make-Ahead Dessert: The ability to prepare these cheesecake balls in advance is a significant advantage. They can be made several days ahead of an event and stored in the refrigerator, freeing up valuable time for other preparations. This make-ahead feature, coupled with their long shelf life when frozen, ensures that they are not only a tasty but also a convenient dessert option.
For those interested in exploring more about the cheesecake aspect, the origins of Cheesecake provide fascinating insights into how this dessert has evolved into a global favorite, influencing recipes like Red Velvet Cheesecake Balls.
Ingredients Needed
Creating Red Velvet Cheesecake Balls requires a combination of simple yet specific ingredients. Each component plays a crucial role in achieving the perfect balance of flavors and textures that make this dessert so irresistible. Here’s what you’ll need:
- Red Velvet Cake Mix: The foundation of this dessert, the cake mix simplifies the baking process, ensuring consistency in flavor and texture. It’s important to follow the box instructions closely, including the addition of water, eggs, and oil, to create a moist and tender cake base.
- Cream Cheese: This is the key to the creamy, tangy filling that contrasts beautifully with the sweet red velvet exterior. Using softened cream cheese is crucial for a smooth mixture.
- Confectioner’s Sugar: Adds sweetness to the cheesecake mixture, balancing the tanginess of the cream cheese and complementing the red velvet flavor.
- Heavy Cream: Incorporated into the cheesecake filling, heavy cream adds richness and helps achieve a light, fluffy texture when whipped to stiff peaks.
- Vanilla Extract: A splash of vanilla enhances the overall flavor profile, adding depth and warmth to the cheesecake filling.
These ingredients come together to create a dessert that’s both visually appealing and deliciously complex. For those looking to add a personal touch or cater to specific dietary needs, there are numerous substitutions and variations available. For example, gluten-free red velvet cake mix can be used to make this dessert accessible to those with gluten sensitivities. Additionally, exploring different flavors of cake mix can lead to exciting new variations of this beloved treat. For more creative dessert ideas, check out Pinterest for Red Velvet Desserts and Cheesecake Ball Recipes, offering a wealth of inspiration for your next baking adventure.
Step-by-Step Guide (Part 1)
Making Red Velvet Cheesecake Balls is a delightful process that combines baking and creativity. Here’s the first part of a detailed guide to ensure your dessert balls are as delicious as they are beautiful:
- Prepare the Red Velvet Cake: Start by preheating your oven to the temperature specified on the red velvet cake mix box. Combine the cake mix with the required ingredients—typically water, vegetable oil, and eggs. Mix until smooth and pour into a greased 9×13 inch baking pan. Bake according to the package instructions. Once baked, allow the cake to cool completely. This is crucial for the next steps, as working with a warm cake can affect the consistency of your dessert balls.
- Crumble the Cake: After the cake has cooled, crumble it into fine pieces. This can be done by hand or using a food processor for a finer texture. The goal is to have a bowl of fluffy, fine cake crumbs that will easily mix with the cheesecake filling and create a smooth outer layer for the balls.
- Make the Cheesecake Mixture: In a large bowl, combine softened cream cheese with confectioner’s sugar. Using an electric mixer, beat the mixture until smooth and creamy. Gradually add in the heavy cream and vanilla extract, continuing to mix until the mixture reaches stiff peaks. This creates a rich and flavorful filling that perfectly complements the red velvet exterior.
This step-by-step guide ensures that the foundation of your Red Velvet Cheesecake Balls is set up for success. The combination of a moist red velvet cake with a creamy cheesecake filling starts to take shape, promising a deliciously indulgent final product. For more tips on creating the perfect cheesecake texture, explore the techniques of cake decorating which can also apply to enhancing the appearance and consistency of cheesecake balls.
Step-by-Step Guide (Part 2)
Continuing from where we left off, here’s how to complete your Red Velvet Cheesecake Balls:
- Form the Balls: Using a small cookie scoop or a spoon, scoop out portions of the cheesecake mixture. Roll these portions into balls between the palms of your hands. Aim for a uniform size to ensure even freezing and coating. Place the formed balls on a baking sheet lined with parchment or wax paper. This step is crucial for achieving the perfect bite-sized treats that are not only tasty but also aesthetically pleasing.
- Chill the Balls: Transfer the baking sheet with the cheesecake balls into the freezer and chill for at least one hour. This step solidifies the balls, making them easier to coat with the red velvet cake crumbs without falling apart. Proper chilling is essential for maintaining the shape and integrity of the cheesecake balls during the coating process.
- Coat with Red Velvet Crumbs: Once the cheesecake balls are chilled and firm, roll them in the red velvet cake crumbs until fully coated. This not only adds the iconic red velvet flavor to every bite but also gives the balls their beautiful, vibrant color. For an extra touch of elegance, you can drizzle them with melted white or dark chocolate and sprinkle with decorative sugar or sprinkles.
- Final Chill: Place the coated balls back on the baking sheet and refrigerate until ready to serve. This final chill sets the coating and ensures the cheesecake balls are firm and deliciously creamy when eaten.
Your Red Velvet Cheesecake Balls are now ready to be enjoyed! Serve them in decorative mini cupcake liners for a special touch, making them perfect for parties, celebrations, or as a luxurious treat for yourself. For more dessert presentation tips, check out Pinterest for Dessert Presentation to inspire your next creation.
Serving and Presentation Ideas
Red Velvet Cheesecake Balls are not only a delight to eat but also to present. Their vibrant color and rich flavor make them a standout dessert at any gathering. Here are some serving and presentation ideas to elevate your dessert game:
- Decorative Mini Cupcake Liners: Placing each cheesecake ball in a decorative mini cupcake liner adds an elegant touch, making them easy to serve at parties or gatherings. This approach also prevents the balls from sticking to each other and makes them more appealing to guests.
- Chocolate Drizzle: Melt white or dark chocolate and use a spoon or piping bag to drizzle it over the cheesecake balls. This not only enhances their visual appeal but also adds an extra layer of flavor. The contrast between the red velvet crumbs and the chocolate creates a visually striking effect.
- Sprinkles and Edible Glitter: For a festive or celebratory touch, sprinkle edible glitter or colorful sprinkles over the cheesecake balls before the chocolate drizzle sets. This customization allows you to match the dessert to the theme of your event.
- Serving Platter Arrangement: Arrange the cheesecake balls on a serving platter with varying heights and textures. Incorporate elements like fresh berries, mint leaves, or edible flowers to create a visually stunning display that draws the eye and tempts the palate.
- Pairing with Beverages: Pair these decadent treats with a suitable beverage to enhance the tasting experience. A glass of dessert wine, a cup of gourmet coffee, or a rich hot chocolate complements the flavors of the red velvet and cheesecake, making for a memorable dessert course.
Incorporating these serving and presentation ideas can transform your Red Velvet Cheesecake Balls from a simple dessert into a show-stopping finale for any meal. For additional inspiration on dessert decoration, exploring cake decorating techniques can provide valuable insights into creating visually appealing dessert presentations.
FAQs
Can these Red Velvet Cheesecake Balls be made ahead of time? Yes, one of the great advantages of Red Velvet Cheesecake Balls is their make-ahead convenience. You can prepare these balls up to 3-4 days in advance and store them in the refrigerator until ready to serve. For longer storage, they can be frozen for up to 3 months, making them a perfect option for planning ahead for special occasions.
How should I freeze and thaw the cheesecake balls? To freeze, place the cheesecake balls on a baking sheet in a single layer and freeze until solid. Once frozen, transfer them to an airtight container or freezer bag. This prevents them from sticking together. To thaw, simply move them to the refrigerator overnight, and they’ll be ready to enjoy the next day.
Are there any variations or substitutions I can make? Absolutely! The recipe for Red Velvet Cheesecake Balls is quite versatile. For a gluten-free version, use a gluten-free red velvet cake mix. If you’re a chocolate lover, consider adding mini chocolate chips to the cheesecake mixture for an extra chocolatey bite. For those who prefer a different cake base, you can substitute the red velvet cake mix with another flavor, using food coloring to achieve the desired color.
Print
Red Velvet Cheesecake Balls
- Author: Naomi
- Total Time: 50 minutes
- Yield: 24 balls 1x
Description
Dive into the world of decadence with these Red Velvet Cheesecake Balls, a perfect blend of the classic red velvet cake and creamy cheesecake, all wrapped up in a bite-sized treat. Coated with a layer of white chocolate and adorned with a sprinkle of red velvet crumbs, these cheesecake balls are the epitome of dessert elegance.
Ingredients
- 1 box red velvet cake mix (plus ingredients called for on the box)
- 16 oz cream cheese, softened
- 1/2 cup confectioner’s sugar
- 2 Tbsp heavy cream
- 1 tsp vanilla extract
- 1 cup white chocolate chips (for coating)
- Red velvet cake crumbs (for decoration)
- Optional: sprinkles, edible glitter, or melted chocolate for drizzling
Instructions
- Bake the red velvet cake as per the box instructions. Allow to cool, then crumble into fine pieces.
- In a mixing bowl, blend the cream cheese, confectioner’s sugar, heavy cream, and vanilla extract until smooth.
- Form the mixture into balls and freeze for about an hour until firm.
- Melt the white chocolate and dip each cheesecake ball to coat. Decorate with red velvet crumbs or as desired.
- Refrigerate until ready to serve, allowing the chocolate to set.
Notes
- Make-Ahead: These cheesecake balls can be made several days in advance, making them perfect for stress-free event planning.
- Storage: Keep refrigerated in an airtight container for up to a week or freeze for up to 3 months.
- Variations: Feel free to experiment with the recipe by adding mini chocolate chips to the filling or using different cake mixes for new flavors.
- Serving Suggestion: Serve in mini cupcake liners for an elegant presentation, perfect for parties or as a delightful gift.
- Prep Time: 20 minutes
- Cook Time: 30 minutes
- Category: Dessert
- Cuisine: American
Nutrition
- Calories: 150 kcal per ball