

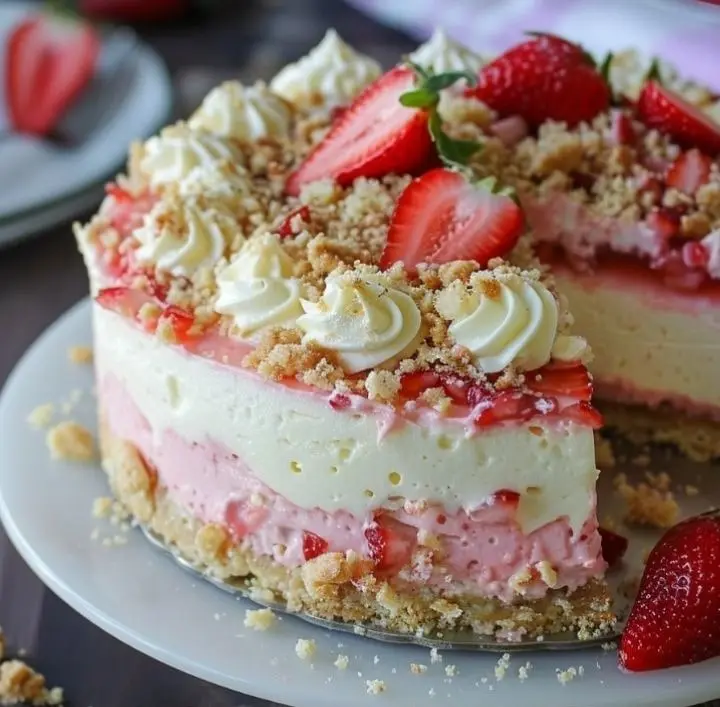
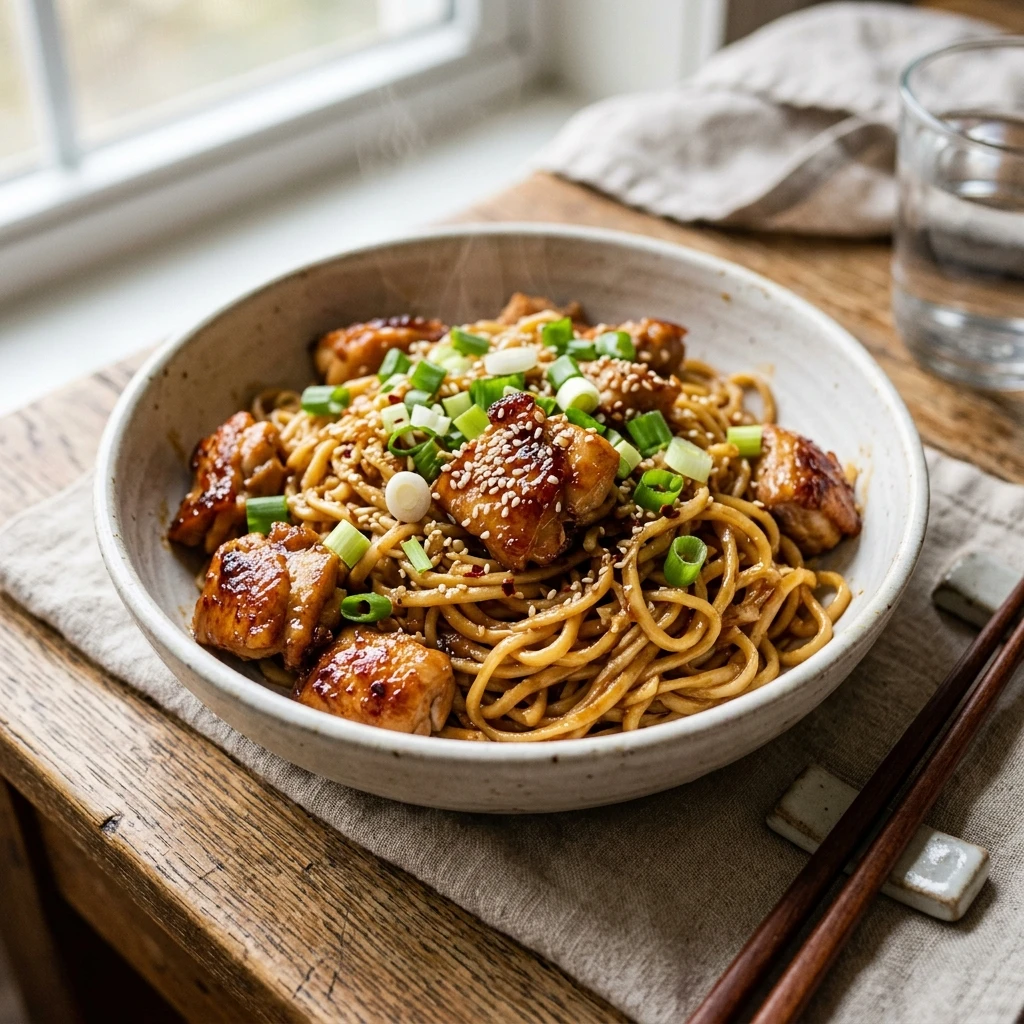
Strawberry Crunch Cheesecake is more than just a dessert; it’s a celebration of flavors and textures that come together in perfect harmony. This no-bake treat has captured the hearts of many, becoming a go-to summer dessert for its ease of preparation and refreshing taste. The combination of a crunchy crust, creamy filling, and the sweet tang of strawberries makes it an irresistible option for any occasion. Whether it’s a family gathering, a special celebration, or simply a moment of indulgence, Strawberry Crunch Cheesecake offers a delightful culinary experience.
The history of cheesecake can be traced back to ancient times, but it’s the modern twists and creative interpretations that have given us gems like the Strawberry Crunch Cheesecake. This particular variation stands out for its no-bake convenience, making it a perfect choice for warm summer days when the oven is best left off. The incorporation of strawberries not only adds a vibrant color and natural sweetness but also makes it an aesthetically pleasing dessert. As detailed in the Wikipedia article on cheesecake, the evolution of cheesecake has seen numerous flavors and styles, but few capture the essence of summer as beautifully as this strawberry variant.
In creating this dessert, inspiration is drawn from a variety of sources. The Strawberry Crunch Cheesecake is a testament to the versatility of cheesecakes and the endless possibilities for innovation. For those interested in exploring more about the star ingredient, the Wikipedia page on strawberries offers a wealth of information on its history, cultivation, and nutritional benefits. The joy of making and enjoying a Strawberry Crunch Cheesecake lies not just in its delicious taste but also in the process of creating something special that can be shared with loved ones. It’s a dessert that decorates itself, with the vibrant red of the strawberries and the golden hue of the crust creating a feast for the eyes as well as the palate.
This introduction sets the stage for a detailed exploration of how to bring this no-bake dream to life. From the selection of ingredients to the step-by-step preparation, each aspect of the Strawberry Crunch Cheesecake will be covered, ensuring that anyone can create this delightful dessert at home. The upcoming sections will guide you through the necessary ingredients, the process of creating the crust and filling, and finally, assembling the cheesecake with its signature strawberry crunch topping. Get ready to embark on a culinary adventure that promises to be as enjoyable as it is delicious.
The Basics of Strawberry Crunch Cheesecake
Ingredients Overview
Creating the perfect Strawberry Crunch Cheesecake starts with gathering the right ingredients. This dessert is a symphony of flavors, each component playing a crucial role in the final outcome. For the crust, you’ll need:
- 1lb Vanilla Cream Cookies for a sweet and crunchy foundation.
- 6 tablespoons Butter, melted, to bind the crust together.
The filling is rich and creamy, requiring:
- 1 small box Strawberry Jello, for the unmistakable strawberry flavor.
- 1 cup Boiling Water to dissolve the jello.
- 16 oz Cream Cheese, softened, ensuring a smooth texture.
- 3/4 cup Granulated Sugar, to sweeten the filling.
- 2 cups Heavy Whipping Cream, adding lightness and volume.
- 1/2 cup Powdered Sugar, for extra sweetness.
- 10 Strawberry Wafer Cookies, to introduce an extra layer of crunch.
For the topping, you’ll need:
- Whipped Topping, to garnish with elegance and a touch of sweetness.
Each ingredient contributes to the overall experience of the cheesecake, from the crunchy base to the creamy filling, and finally, the delightful topping that makes every bite memorable.
Equipment Needed
In addition to the ingredients, having the right equipment is essential for creating this no-bake dessert. You’ll need:
- A food processor or blender to crush the cookies into fine crumbs.
- A 10″ springform pan, allowing for easy assembly and presentation.
- Mixing bowls for preparing the filling and topping.
- A mixer (stand or hand), crucial for achieving a smooth filling.
- Measuring cups and spoons, for precise ingredient amounts.
- A spatula, for folding and spreading layers evenly.
With these tools and ingredients at your disposal, you’re well-equipped to create a stunning Strawberry Crunch Cheesecake that’s sure to impress.
Step-by-Step Recipe Guide
Preparing the Crust
The foundation of any great cheesecake is its crust, and the Strawberry Crunch Cheesecake is no exception. Here’s how to prepare the perfect base for your no-bake dessert:
- Crush the Cookies: Begin by processing 26 vanilla cream cookies in a food processor or blender until you have fine crumbs. This will create the ideal texture for your crust.
- Mix with Melted Butter: Transfer the cookie crumbs to a mixing bowl and combine with 6 tablespoons of melted butter. The mixture should resemble wet sand, holding together when pressed.
- Press into Pan: Take your 10″ springform pan and press the crumb mixture firmly into the bottom. Use the bottom of a cup to create an even layer.
- Chill: Place the crust in the freezer for 15 minutes to set. This step is crucial for a firm base that will support the creamy filling.
Creating a crust that’s both flavorful and structurally sound is essential for the overall success of your cheesecake. The vanilla cream cookies provide a sweet, crunchy base that complements the creamy filling, while the butter acts as a binding agent, ensuring the crust holds together.
Making the Filling
The filling of the Strawberry Crunch Cheesecake is where the magic happens. It’s creamy, it’s strawberry-infused, and it’s absolutely divine. Follow these steps to create the filling:
- Dissolve Strawberry Jello: In a small bowl, dissolve 1 box of strawberry jello in 1 cup of boiling water. Allow it to cool slightly but do not refrigerate.
- Cream Cheese and Sugar: In a large mixing bowl, beat together 16 oz of softened cream cheese and 3/4 cup granulated sugar until smooth. This step is crucial for a lump-free filling.
- Whip Heavy Cream: In another bowl, whip 2 cups of heavy whipping cream with 1/2 cup powdered sugar until stiff peaks form. This will add lightness to your cheesecake.
- Combine: Fold the whipped cream into the cream cheese mixture in two additions, then gently fold in the cooled strawberry jello. This step requires a delicate touch to maintain the airiness of the whipped cream.
- Layer Over Crust: Pour half of the filling over the chilled crust, then add a layer of crushed strawberry wafer cookies for extra crunch. Top with the remaining filling and smooth the top.
- Chill: Freeze the cheesecake for 15 minutes, then add the remaining strawberry mixture on top. Refrigerate for at least 4 hours, or until set.
The filling is the heart of the Strawberry Crunch Cheesecake, with each ingredient playing a role in creating its signature creamy texture and strawberry flavor. The process of layering flavors and textures ensures that every bite is a delightful experience.
Assembling the Cheesecake
With the crust chilled and the filling ready, assembling your Strawberry Crunch Cheesecake is the next exciting step. This process not only layers the flavors but also presents an opportunity to create a visually stunning dessert. Here’s how to bring it all together:
- Initial Layering: Begin by adding a layer of the creamy strawberry filling over the chilled crust. Use a spatula to spread the mixture evenly, ensuring a smooth surface.
- Adding the Crunch: For the signature crunch, take the reserved vanilla cream cookies and strawberry wafer cookies, crush them lightly, and sprinkle over the first layer of filling. This adds not only texture but also an extra burst of flavor.
- Final Layer: Add the remaining strawberry filling on top of the crunchy layer. Again, aim for a smooth, even layer that will make slicing the cheesecake easier once it’s set.
- Chill to Set: The key to a perfect no-bake cheesecake is allowing it enough time to set. Place the assembled cheesecake in the refrigerator for at least 4 hours, though overnight is ideal. This ensures that the cheesecake is firm enough to slice and hold its shape.
- Garnishing: Before serving, add a final touch by piping swirls of whipped topping around the edge of the cheesecake. This not only adds a decorative element but also a light, creamy texture that contrasts beautifully with the dense filling and crunchy crust.
- Serving: Use a hot knife (dipped in hot water and then dried) to slice the cheesecake, ensuring clean cuts. Garnish each slice with a fresh strawberry or a sprinkle of crushed cookies for an extra touch of elegance.
Assembling the Strawberry Crunch Cheesecake is an art that involves layering textures and flavors to create a dessert that’s as delightful to look at as it is to eat. Each step, from the initial layering to the final garnish, contributes to the overall experience, making this cheesecake a true masterpiece of culinary creativity.
Creating the Strawberry Crunch Topping
The crowning glory of the Strawberry Crunch Cheesecake is its unique topping. This layer not only adds texture and flavor but also serves as the visual centerpiece of the dessert. Follow these steps to create a topping that’s as delicious as it is beautiful:
- Crush the Cookies and Strawberries: Take the remaining vanilla cream cookies and strawberry wafer cookies, and crush them into small pieces. You want a mix of sizes for texture. Combine these with the freeze-dried strawberries, further crushing the strawberries slightly to blend the flavors.
- Mix with Melted Butter: Add the crushed cookies and strawberries to a bowl. Pour in melted butter and mix until everything is well coated. This will help the topping stick together and add a rich, buttery flavor that complements the sweetness of the strawberries.
- Add to Cheesecake: Once your cheesecake has set, take it out of the refrigerator. Sprinkle the strawberry crunch mixture evenly over the top, pressing lightly to ensure it adheres to the filling.
- Chill Again: Although the cheesecake is set, placing it back in the refrigerator after adding the topping for about an hour will help the flavors meld and ensure the topping stays in place.
- Serve and Enjoy: With the cheesecake fully assembled and chilled, it’s ready to be served. Each slice will have a beautiful layer of strawberry crunch topping, making every bite a delightful mix of creamy, crunchy, and fruity flavors.
The Strawberry Crunch Topping is more than just a decorative element; it’s a testament to the thoughtful composition of the cheesecake. It balances the creaminess of the filling and the softness of the crust with a satisfying crunch and bursts of strawberry flavor. Creating this topping is a simple process, but it significantly enhances the overall eating experience, making the Strawberry Crunch Cheesecake a dessert that’s sure to impress at any gathering.
Additional Tips and Variations
Expert Baking Tips
Creating the perfect Strawberry Crunch Cheesecake is an art that comes with its own set of challenges. Here are some expert tips to ensure success:
- Temperature Matters: Ensure all your ingredients, especially cream cheese and heavy whipping cream, are at room temperature. This makes it easier to blend ingredients smoothly, preventing lumps in your filling.
- Gentle Mixing: When combining your filling, mix gently to avoid incorporating too much air. Overmixing can lead to air bubbles that might cause your cheesecake to crack or affect its texture.
- Chill Thoroughly: Patience is key. Allow your cheesecake to chill and set properly, preferably overnight. This ensures it’s firm enough to slice neatly.
- Water Bath Alternative: If you’re concerned about moisture from a water bath affecting the crust, you can place a pan of water on the rack below your cheesecake instead. This helps maintain a moist environment in the oven without the risk.
Substitutions and Variations
The Strawberry Crunch Cheesecake is versatile, allowing for various substitutions and variations to suit different tastes and dietary needs:
- Crust Variations: Instead of vanilla cream cookies, try using graham crackers, digestive biscuits, or even chocolate cookies for a different flavor profile. Gluten-free cookies can be used for a gluten-free version.
- Filling Flavors: While strawberry is a classic, feel free to experiment with other flavors. Raspberry, blueberry, or even a citrus twist like lemon can offer a refreshing change.
- Dairy-Free Options: For a dairy-free version, use plant-based cream cheese and whipping cream. These substitutes work well in the recipe and offer a similar texture and taste.
- Decoration Ideas: Beyond the strawberry crunch topping, consider garnishing with fresh strawberries, mint leaves, or a drizzle of chocolate for added visual appeal and flavor.
These tips and variations offer guidance and inspiration to tailor the Strawberry Crunch Cheesecake recipe to your preferences, ensuring every bite is as delightful as the last.
FAQs
Can I make Strawberry Crunch Cheesecake ahead of time? Absolutely! Strawberry Crunch Cheesecake is an ideal make-ahead dessert. Prepare and refrigerate it up to two days in advance. The flavors meld beautifully over time, making it even more delicious.
Is freezing the cheesecake an option? Yes, Strawberry Crunch Cheesecake freezes well. Wrap it tightly in plastic wrap, then aluminum foil. It can be frozen for up to a month. Thaw overnight in the refrigerator before serving.
How do I prevent the cheesecake from cracking? To avoid cracks, ensure all ingredients are at room temperature and mix the filling gently to prevent air bubbles. A pan of water in the oven can also help minimize the risk of cracking by keeping the oven humid.
Can I use frozen strawberries? Frozen strawberries work well in the filling and sauce. Thaw and drain them before use to avoid adding excess moisture to the cheesecake.
What if I don’t have a springform pan? While a springform pan is ideal for cheesecakes, you can use a deep pie dish as an alternative. Line it with parchment paper for easier removal of the cheesecake slices.
Print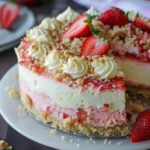
Strawberry Crunch Cheesecake
- Author: Naomi
- Total Time: 4 hours 45 minutes
- Yield: 12 servings
Description
Indulge in the ultimate summer dessert with this Strawberry Crunch Cheesecake. This no-bake delight layers a crunchy vanilla cookie crust, a creamy strawberry-infused filling, and a signature strawberry crunch topping. It’s a refreshing, rich, and perfectly balanced treat that’s sure to impress at any gathering. Whether you’re celebrating a special occasion or simply satisfying a sweet tooth, this cheesecake is a beautiful, delicious way to enjoy the flavors of summer without turning on your oven.
Ingredients
Instructions
Notes
- Make-Ahead: This cheesecake is perfect for preparing in advance. Completing it a day or two before serving allows the flavors to intensify and the cheesecake to set perfectly.
- Serving Suggestion: Serve chilled. For an elegant presentation, garnish with fresh strawberries and a sprinkle of crushed vanilla cookies just before serving.
- Storage: Keep refrigerated and consume within 3 days for the best taste and texture. For longer storage, freeze as directed in the FAQs section.
- Customization: Feel free to adapt the recipe to your taste by experimenting with different crust options or substituting the strawberries for other fruits. The versatility of this recipe makes it a canvas for your culinary creativity.
- Allergy Information: For a gluten-free version, use gluten-free cookies for the crust and check all ingredient labels for hidden gluten. Dairy-free alternatives can be used for a dairy-free version, but adjustments to texture and taste may be necessary.
- Prep Time: 30 minutes
- Cook Time: 45 minutes
- Category: Dessert
- Cuisine: American


Sounds delicious. But instructions are a little confusing. In detailed instructions at the beginning, it says to mix whipped cream into cream cheese mixture and then add jello mixture. Layer half of this over crumb base and then half of crumb mixture and then repeat again. In print instructions it says “Whip the heavy cream with powdered sugar to stiff peaks, then fold it into the cream cheese mixture and cooled strawberry jello in two steps. Layer half of the whipped cream mixture over the crust, followed by half of the strawberry jello mixture.”
★★★★
Yes. I am confused about the same thing. The directions tell you to mix the jello and heavy cream mixture with the cream cheese mixture, so I’m not sure where the two layers come from🤷🏻♀️
I made this last week flying by the seat of my pants. I couldn’t make since out of these instructions, so I just went with what I thought would work. It did come together fine and my family has requested it for my grandson’s birthday tomorrow. I have read the recipe a dozen times and came to the conclusion that I should mix half of the cream cheese and whipped cream mixture with the jello and save the other half for the layers. Anyway, that’s what I did so fingers crossed it works! I also chopped a cup of strawberries and added them to jello.
I made this and loved it! I’m not sure if I mixed whipping cream and strawberry jello/cream cheese correct as the instructions are a bit confusing.
★★★★
if you read the directions it mentions at the beginning there are two steps
I read and reread….this is one of the worst posts I have seen. Why give “expert” tips on baking the cheesecake, when the actual recipe clearly doesn’t require the cheesecake be baked. The picture doesn’t match the recipe given. Naomi, if you need someone to edit and proof for you, reach out to me because that is just not your forte Honey.
★
Low rating is for directions. Why are there tips for baking and using a water bath for a refrigerated cheesecake? I still may make it but will rely on my cooking experience. Directions for combining and layering are definitely confusing. Makes me hesitant to even look at her other recipes.
★★★
Just saw the same recipe same picture on another site. Directions slightly different but still had issues with directions. Only difference was when people asked questions, author answered the questions. Also, it was noted. The picture was a double recipe. Not sure but doubt if it’s either one of their original recipes if they’ve even made it.
★★