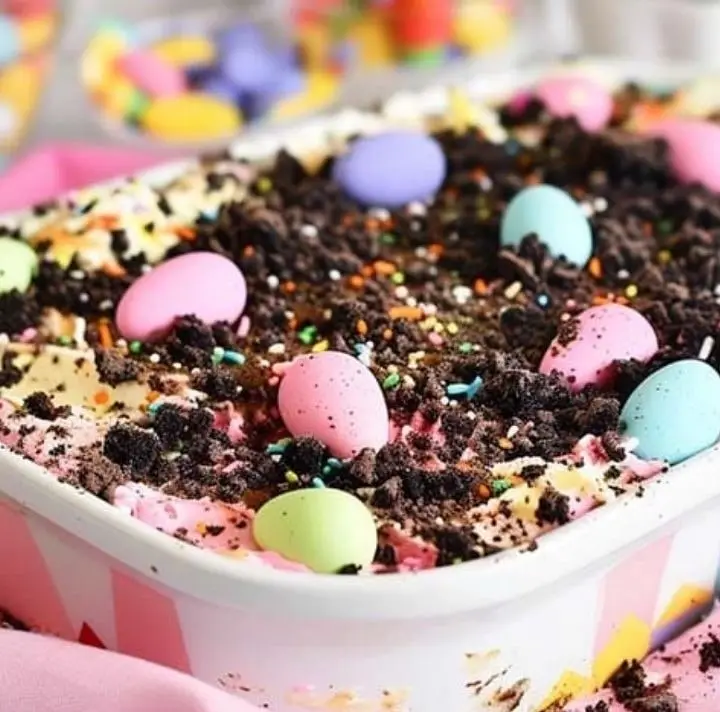
Easter is a time of celebration, where food plays a central role in bringing families together. Among the myriad of desserts that grace the Easter table, Easter Dirt Cake stands out for its simplicity, deliciousness, and the fun it brings to the kitchen. This no-bake dessert, featuring layers of crushed Oreos, fluffy cream cheese mixture, and chocolate pudding, is a guaranteed hit among both kids and adults. Its playful appearance, adorned with candy-coated chocolate eggs and gummy worms, makes it a festive centerpiece for any Easter gathering.
The tradition of making special desserts for Easter is rooted in various cultures around the world, each with its unique twist. The Easter Dirt Cake, however, is a relatively recent innovation that has quickly become a favorite in many households. Its appeal lies not just in its taste but also in its ease of preparation and the joy of decorating it with Easter-themed candies. Unlike traditional cakes that require baking, this dessert can be assembled in minutes and is a great way to involve children in the kitchen.
For those interested in exploring more about Easter traditions and desserts, a wealth of information can be found on Wikipedia’s Easter page and Pinterest’s Easter dessert recipes. These resources offer insights into the rich tapestry of Easter celebrations and provide inspiration for making your Easter Dirt Cake uniquely yours. Whether you’re a seasoned baker or trying your hand at dessert-making for the first time, this Easter Dirt Cake recipe promises to deliver smiles and sweet memories.
Ingredients and Supplies
To embark on the delightful journey of making an Easter Dirt Cake, you’ll need a selection of simple ingredients and a few kitchen supplies. Here’s what you’ll gather:
Ingredients:
- Oreo Cookies: The foundation of the dirt cake, these cookies are crushed to mimic the ‘dirt’ layer. For an Easter twist, consider using the seasonal varieties that come in different flavors and colors.
- Chocolate Pudding Mix: Two packages of instant mix ensure the cake has a rich, creamy layer that complements the crunchiness of the Oreos.
- Milk: Acts as the base for the pudding. Whole milk is preferred for its creaminess, but 2% can also be used.
- Cream Cheese & Unsalted Butter: Softened, these ingredients are key for the smooth, velvety layer that sits between the Oreos and pudding.
- Powdered Sugar: Adds sweetness to the cream cheese layer.
- Whipped Topping: Cool Whip or homemade whipped cream brings lightness to the cake.
- Decorations: Candy-coated chocolate eggs and gummy worms for the festive touch.
Supplies:
- Electric Mixer: For blending the cream cheese mixture to perfection.
- Large Mixing Bowls: Essential for preparing the pudding and cream cheese layers separately.
- Food Processor or Rolling Pin: For crushing the Oreos into fine crumbs.
- Serving Dish: A clear dish is ideal for showcasing the layers of the cake.
- Spatula: For folding ingredients gently and spreading layers evenly.
While the list of ingredients and supplies might seem extensive, the beauty of this recipe lies in its flexibility. For instance, substitutions for cream cheese can be found for those with dietary restrictions, and insights into making the perfect homemade whipped cream are readily available for those who prefer to avoid store-bought Cool Whip.
This dessert not only delights the palate but also serves as a creative outlet, allowing for endless decoration possibilities. From using edible Easter grass to simulate a garden to arranging candy eggs as hidden treasures, the Easter Dirt Cake becomes a canvas for your imagination. With all your ingredients and supplies at the ready, the adventure of assembling this festive treat begins.
Step-by-Step Recipe Instructions
Creating an Easter Dirt Cake is an enjoyable process that involves layering ingredients to create a delicious dessert that’s as fun to make as it is to eat. Follow these step-by-step instructions to assemble your cake:
Prepare the Oreo Layer:
- Begin by crushing the Oreo cookies into fine crumbs using a food processor or a rolling pin. Aim for a consistency that resembles dirt, a key element of the cake’s playful theme. This process not only sets the foundation for our cake but also engages the senses, from the tactile joy of crushing cookies to the chocolatey aroma that fills the air.
- Reserve a handful of the crushed Oreos for the top layer of the cake, then spread the rest evenly at the bottom of your serving dish. This creates the first layer of our “dirt” cake, providing a crunchy base that contrasts beautifully with the creamy layers to come.
Mix the Pudding Layer:
- In a large mixing bowl, whisk together the chocolate pudding mix and milk until smooth. The pudding mix should start to thicken as it sets, transforming into a rich and creamy layer that will sit atop the Oreo base. This step is crucial for achieving the right consistency; too thin, and the cake won’t hold its shape; too thick, and it won’t meld with the other layers as pleasantly.
- Let the pudding mixture sit for a few minutes to thicken further. This waiting period allows the pudding to achieve the perfect texture for layering, ensuring it’s firm enough to support the subsequent layers without being overly dense.
Create the Cream Cheese Mixture:
- In a separate bowl, use an electric mixer to beat the softened cream cheese, unsalted butter, and powdered sugar until smooth. This mixture should be light and fluffy, serving as the cake’s decadent middle layer. The sweetness of the powdered sugar balances the tanginess of the cream cheese, while the butter adds richness and helps solidify the layer once chilled.
- Gently fold in the whipped topping to the cream cheese mixture. This step introduces air into the mixture, keeping it light and ensuring that our cake has a delightful mousse-like texture. The whipped topping also makes the cream cheese layer more spreadable, facilitating easier assembly.
Layer the Cake:
- Start layering your cake by spreading half of the cream cheese mixture over the crushed Oreo base in your serving dish. Aim for an even layer that covers the Oreos completely, creating a smooth canvas for the next layer.
- Carefully spoon the thickened pudding over the cream cheese layer, spreading it out to form a uniform layer. The contrast between the light, fluffy cream cheese and the dense, chocolatey pudding adds complexity to the cake’s texture and flavor profile.
- Repeat the layers, starting again with the remaining cream cheese mixture and finishing with a layer of the reserved crushed Oreos. This repetition enhances the cake’s visual appeal, with the final layer of Oreos mimicking dirt and setting the stage for the decorative elements that bring the Easter theme to life.
Chill:
- Refrigerate the cake for at least 1 hour to set. This chilling time is essential for the layers to firm up, allowing the cake to be cut into neat slices. It also intensifies the flavors, as the ingredients meld together and the Oreo crumbs absorb moisture from the layers above, becoming even more delicious.
Decorate:
- Just before serving, decorate the cake with candy-coated chocolate eggs and gummy worms to enhance its Easter theme. The candy eggs nestled in the “dirt” evoke the imagery of an Easter egg hunt, while the gummy worms add a whimsical touch that delights children and adults alike.
The decoration phase is where creativity shines, with the opportunity to personalize your Easter Dirt Cake. Whether arranging the candies to spell out a festive message or creating patterns that mimic a spring garden, this final step transforms the cake into a celebratory masterpiece.
This no-bake Easter Dirt Cake is more than just a dessert; it’s a festive experience that brings joy and sweetness to your Easter celebrations. By following these detailed instructions, you’ll create a dessert that’s not only delicious but also a visual treat, embodying the spirit of Easter with every layer and decoration.
Decorating Your Easter Dirt Cake
Decorating your Easter Dirt Cake is where the fun really begins. This step transforms a simple dessert into a spectacular Easter showcase. Here are some creative ideas to make your cake not only delicious but also a feast for the eyes:
- Candy-Coated Chocolate Eggs: Strategically place these colorful candies on the top layer to resemble eggs hidden in the garden. For an extra touch, nestle them slightly into the “dirt” to make them look partially buried.
- Gummy Worms: Wiggle a few gummy worms in and out of the cake layers, with some peeking out from the top. This playful addition brings a smile to everyone’s face and makes the cake even more thematic.
- Edible Easter Grass: If you want to add a pop of color and texture, consider sprinkling edible Easter grass over the cake. This can mimic the look of fresh spring grass and adds a unique element to the presentation.
- Peeps Marshmallow Bunnies: For a quintessential Easter touch, arrange a few Peeps bunnies around the cake. Their bright colors and shapes make the cake instantly recognizable as an Easter dessert.
- Flower Decorations: Use icing or fondant to create small flowers, or place edible flowers on top for a springtime garden effect. This not only adds beauty to your cake but also introduces a natural element.
Remember, the goal is to make your Easter Dirt Cake visually appealing and aligned with the Easter theme. Each decoration should contribute to the overall aesthetic, turning the cake into a centerpiece that captures the essence of spring and the joy of Easter.
When decorating, feel free to let your creativity flow. There’s no right or wrong way to decorate your cake, and each creation will be unique. Whether you’re making this cake for a family gathering or as a fun activity with kids, the decorations are what will make your Easter Dirt Cake truly special and memorable.
Serving Suggestions and Presentation
Presenting your Easter Dirt Cake in a way that accentuates its layers and decorations is key to making this dessert a standout at your Easter celebration. Here are some tips to serve and showcase your cake with flair:
- Clear Serving Dish: Use a clear trifle bowl or glass baking dish to assemble your cake. This allows the colorful layers and textures to be visible from the side, adding to the visual appeal and enticing guests to dive in.
- Individual Servings: For a more personalized touch, consider making mini versions of the dirt cake in clear cups. This not only makes serving easier but also gives guests their little garden to enjoy.
- Garnish with Fresh Mint: Adding a sprig of fresh mint to each serving not only introduces a fresh aroma but also enhances the garden theme of the cake. It’s a simple touch that can elevate the presentation.
- Easter Themed Serving Spoons: Utilize serving spoons or utensils decorated with Easter motifs, such as bunnies or eggs, to reinforce the holiday theme even further.
- Decoration at the Table: Invite guests to add their own final touches to the cake with a small bowl of extra candy eggs, gummy worms, or edible flowers placed on the table. This interactive element can be especially fun for kids.
Serving your Easter Dirt Cake with thoughtfulness and creativity not only makes the dessert a delicious treat but also a memorable part of your Easter festivities. By following these suggestions, you’ll ensure that your cake is as much a feast for the eyes as it is for the palate, making your Easter celebration even more special.
FAQs
Can I Make the Easter Dirt Cake Ahead of Time?
Yes, you can prepare this cake up to 24 hours in advance. Assemble the layers as instructed, cover, and refrigerate. However, save the decorative candies and gummy worms for adding just before serving to keep them fresh and vibrant.
What Substitutions Can I Make?
- For a Lighter Version: Use low-fat cream cheese, skim milk, and a light whipped topping. You can also find sugar-free pudding mixes and Oreos to reduce the calorie count.
- For Gluten-Free Guests: Substitute regular Oreos with a gluten-free variety. Ensure all other ingredients are gluten-free as well.
- Vegan Options: Use vegan cream cheese, plant-based milk, and a vegan whipped topping. Check that the Oreos and pudding mix you select are vegan-friendly.
How Do I Store Leftovers?
Cover the cake tightly with plastic wrap or an airtight container and refrigerate for up to 3 days. For longer storage, you can freeze the cake, though the texture may change slightly upon thawing. Remove any decorative candy before freezing.
Can This Recipe Be Halved or Doubled?
Absolutely! The recipe is quite forgiving, so you can easily adjust the quantities to suit the size of your gathering. Just ensure to use a dish that accommodates the altered volume appropriately.
How Can I Prevent the Cake from Becoming Too Runny?
Ensure your pudding mixture has sufficiently thickened before layering, and don’t overmix the cream cheese layer, as this can introduce too much air and make it less stable. Using full-fat ingredients where possible will also help maintain the desired consistency.
Print
Easter Dirt Cake
- Author: Naomi
- Total Time: 1 hour 10 minutes
- Yield: 10 servings 1x
Description
This Easter Dirt Cake is a delightful, no-bake dessert that combines the crunchiness of crushed Oreos with the creaminess of a chocolate pudding and cream cheese mixture, all topped off with playful Easter candy decorations. Perfect for spring celebrations, this dessert is not only a feast for the taste buds but also a visual treat, resembling a charming little garden that’s sure to captivate the hearts of both children and adults.
Ingredients
1 package (36 cookies) Oreo cookies, crushed
2 packages (3.9 ounces each) instant chocolate pudding mix
4 cups cold milk
8 ounces cream cheese, softened
1/4 cup unsalted butter, softened
1 cup powdered sugar
12 ounces whipped topping (e.g., Cool Whip), thawed
Candy-coated chocolate eggs and gummy worms for decoration
Instructions
Prepare the Oreo Layer: Crush the Oreo cookies into fine crumbs using a food processor or rolling pin. Set aside.
Mix the Pudding Layer: In a large bowl, whisk together the chocolate pudding mix and milk until smooth. Let it sit to thicken.
Create the Cream Cheese Mixture: Beat the softened cream cheese, butter, and powdered sugar with an electric mixer until smooth. Fold in the whipped topping gently.
Layer the Cake: In your serving dish, start with a layer of crushed Oreos, followed by the cream cheese mixture, and then a layer of pudding. Repeat the layers, finishing with Oreos on top.
Chill: Refrigerate the cake for at least 1 hour to set.
Decorate: Before serving, decorate with candy eggs and gummy worms.
Notes
- Make Ahead: This cake can be prepared a day in advance, making it a convenient option for busy hosts. Just remember to add the candy decorations right before serving to maintain their texture and color.
- Customization: Feel free to get creative with the layers and decorations. This cake is incredibly versatile, allowing for various substitutions to accommodate different dietary needs or preferences. Experiment with different pudding flavors, Oreos, or even the types of candy for decoration to make this cake uniquely yours.
- Serving Tip: For an extra wow factor, serve the Easter Dirt Cake in a clear dish to showcase the beautiful layers. Individual servings in clear cups can also make for a delightful presentation and easy serving.
- Decoration Ideas: Beyond the suggested candy-coated chocolate eggs and gummy worms, consider using edible flowers, sprinkles, or themed cake toppers to bring your dirt cake to life. Easter is a time for creativity and joy, so let your decorations reflect that spirit.
- Storage: Leftover cake can be stored in the refrigerator for up to 3 days. While it’s possible to freeze the cake, doing so may alter its texture, so it’s best enjoyed fresh or within a few days of making.
- Prep Time: 10 minutes
- Cook Time: 1 hour
- Category: Dessert
- Cuisine: American
Nutrition
- Calories: 400 kcal